Today's tutorial was a collaborative effort between my mom and I. While she was visiting last week (oh how I miss her!!!!) she saw this Dollar Store straw placemat that I had in my studio. She asked me what I was planning on doing with it. I told her how I had seen this contest online on making things out of dollar store items, but I just never had the time to actually make anything with it!!! She said that she would have made a clutch out of it. I was like "WHAT AN AWESOME IDEA MOM!!!!!!!" And so.. This tutorial was born. She had all the ideas, and I just put it together and made the tutorial.... Enjoy!
MATERIALS:
placemat (dollar store for cheap ones!!)
Fabric for lining (I just cut a piece that was big enough to fold in the edges)
felt scrap
Snap (and tool to put snap in... you can buy them together in a pack at JoAnn's or Walmart)
Something cool to adorn/cover the snap!
TIME: This is a one hour/ one nap project
1. Lay the placemat on the fabric and cut. I made the ends longer, because my mom wanted to have the fabric hang over the edge when after I hemmed it.
2. Fold in the long side edges 1x and pin.
3. At the top and bottom edges, fold down the hem once, and then fold in the corners before folding the edge over one more time (encased hem) so that the corners don't peek out.
( This is what it will look like after folding the edges over again. see how we left it longer on the end so it peeks out from the edge??? I love that detail.)
4. Flip the pinned fabric over so that the wrong side of the fabric is facing the "wrong" side of the placemat (even though there really isn't a wrong side).
5. Take it to your sewing machine and stitch the lining fabric to the placemat.
6. Fold over one side of the placemat and sew down the edges. Almost done!!!
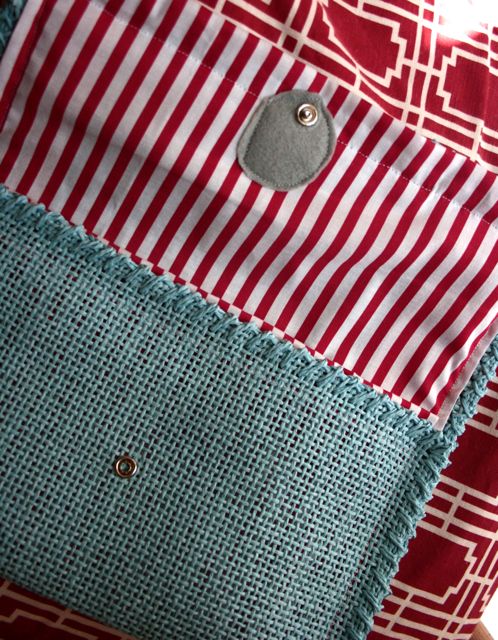
7. cut out a circle or square from the felt and attach a snap (see instructions on the package)
8. Sew the circle on to the inside of the flap that opens. (see below)
9. fold the opening shut and determine where the other part of the snap should go and mark it. Then attach the snap.
10. attach something to the front to make it look pretty!! I used a felt feather cluster that I normally put on my
headbands!! ( I used lots of hot glue to attach it)
11. Use it for a day out on the town! or on your back porch like I did... This thing is perfect for me because whenever I run out with out Olivia I need something small to put my keys and cards in BESIDES the diaper bag. And I think the straw look is perfect for summer. Thanks
mom for such a great idea!!!
(p.s. she says she used to show people how to make these things all the time, that's how she had the idea. and you wonder where I get my skills from??? HER!)
POST EDIT: see the
BIG BOW tutorial for more ideas on how to decorate this purse (or DIAPER CLUTCH!!!)


26 comments:
Your mom is the coolest. Next to mine, of course. I'm going to have to try this out. I also think it would make a much cooler diapes/wipes carrier than what I've seen. And my two-year-old doesn't seem to want to potty train, so... yeah.
I love it. And your felting wonders blow me away.s
This is beautiful! I wish I could sew just to have this.
i love this! like mother like daughter. what a genius idea!
That is so pretty. I love how you lined it. Thanks so much, I'll be linking.
I love it.
home jobs india
Really cute...I love the embellishment.
Holly
504 Main
I made one of these last night for myself and one for a friend. They turned out so great thanks to your awesome tutorial! I actually got the same placemats too, randomly, ( dollar tree?) thanks for the great idea!
I just came to your blog because I saw you were on the email from Shannon (luvinthemommyhood) this afternoon and I wanted to check out your blog - don't know why I haven't been here before - your stuff is great.
This idea is genius!! I am definitely going to be trying this for sure!
Thanks,
Lindsay
this is really cute!!!
I looooooove this like, so much. I'm definitely going to link to this post!
Yay, it's so cute! Placemats are so fun to work with!
Thanks for this incredible idea!I'm going to try it out ASAP!
this is great I posted a link to this in my blog hope that is OK... :)
Terrific idea and great tutorial!
I Love this idea! I am going to feature it on somewhatsimple.com next Tuesday! Thanks for sharing!
WHAT İS THE PLACEMAT
I added this project to our site and linked to you. We think it's a great project our readers will love to make! Thank you and if you have other projects you'd like us to feature please feel free to contact me.
Kirsten
Editor
AllFreeSewing.com
it is nice bag
WAY TOO CUTE!!!
Wow.! it's amazing..!!!
Work from home jobs
This is one of the prettiest placemat bags I have seen.Great tutorial.
I found a rather thin placemat. Any suggestions on what to use to make it sturdier
Maybe us a thicker fabric, maybe upholstery fabric, for your lining! E.arts
wow, brilliant.. I like it :))))
Brilliant.. I like it :)))) thx for tutuorial.
Post a Comment