Showing posts with label babies and toddlers. Show all posts

Monday, March 4, 2013

Clip-on bow-tie for GIRLS (or boys)!!


I really should have a better "Introducing baby Luca!" photo for you all, but if you really care about seeing my adorable, now 2 month old baby boy who weighs THIRTEEN POUNDS, we are probably already friends on instagram. If you follow me on there then you already know how super cute and pudgy he is, how he looks just like my husband, and how the reason I haven't blogged in 2 months is due to trying to cope with 3 kids 3 and under, and a week long stay in the hospital that lead to 2 more weeks of double vision. <----not at="" computer....="" for="" good="" p="" staring="" the="">
I am now getting into the swing of things and am better adjusted to this crazy crazy life of mine. It is NO JOKE taking care of three baby/toddlers! Just taking them somewhere is a workout. Getting three kids buckled, un-buckled, into strollers etc is killing me. I don't like having to go too many places because I'm sweaty and worn out! But one day they will all be able to walk themselves, unbuckle themselves, and get themselves situated in the car and life will be a tad easier in that department. For now I am just trying to focus on how cute they all are (when they aren't screaming at each other or coloring on the walls of course). I love being a mother, more than I ever imagined (I always thought I didn't want kids--HA!), but its also even harder than I imagined. Luckily I have a really great, helpful partner/husband who gives me lots of rest on the weekends. Only 3 more months left til that's over and he starts his Ob-Gyn residency! ahhh!

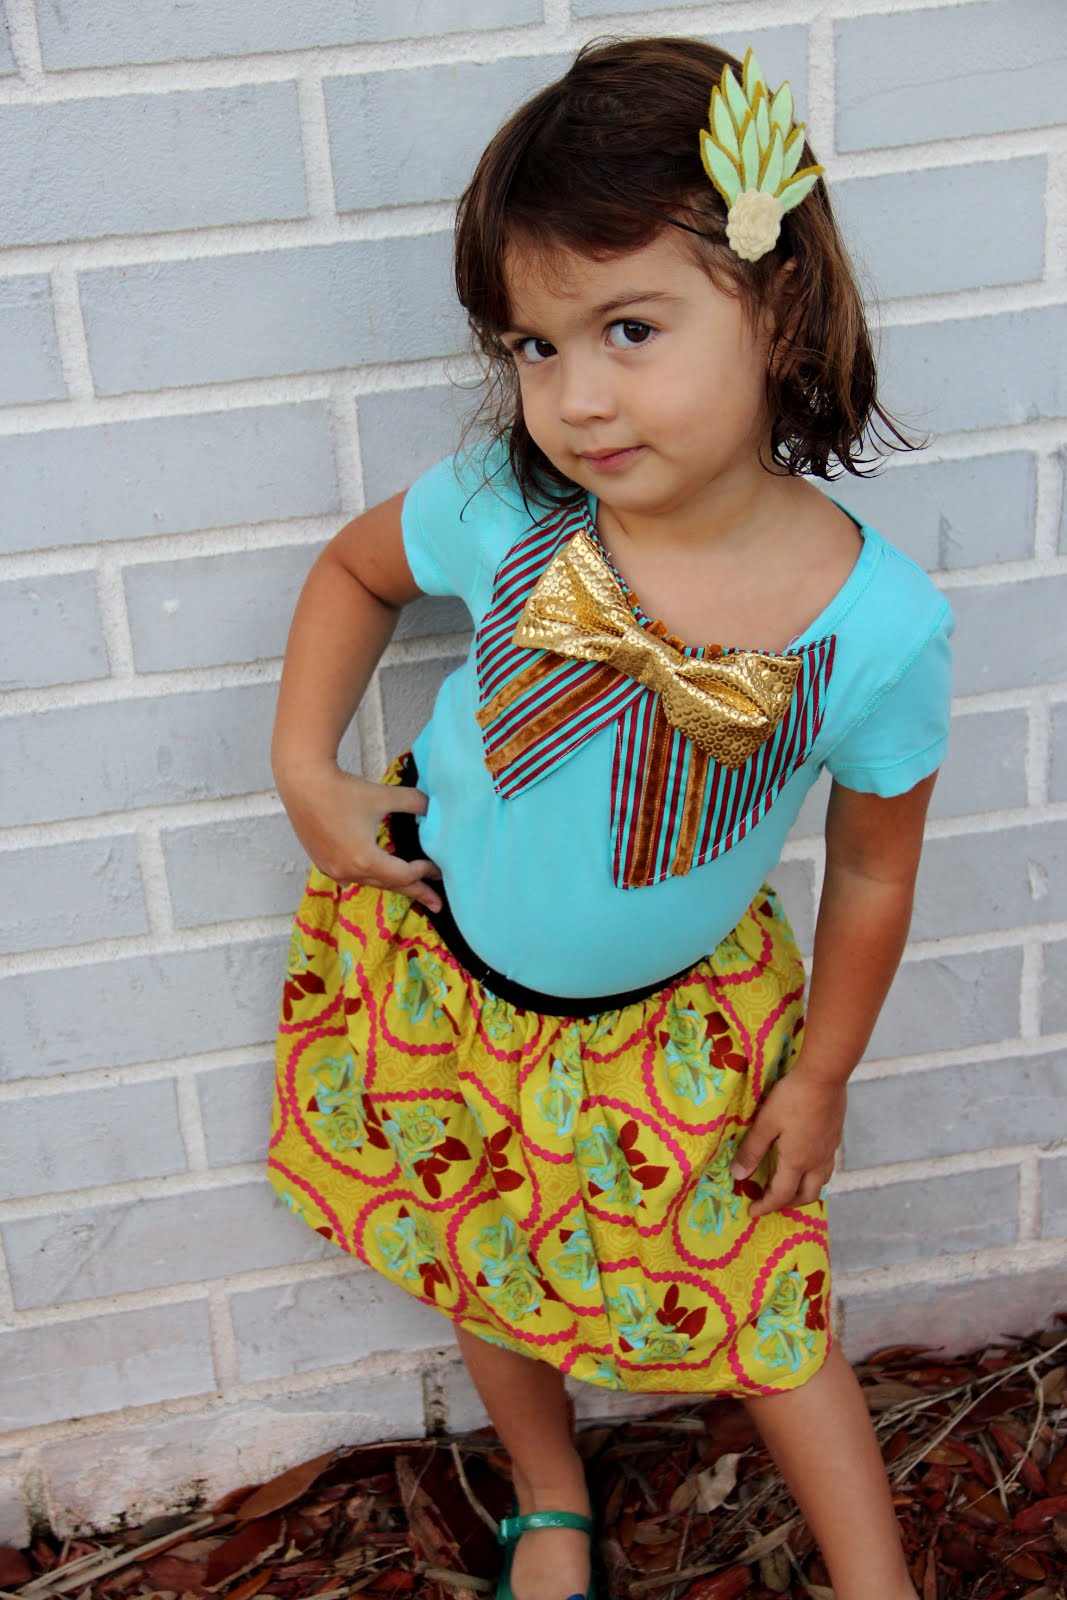
Okay, so on to the subject for today: BOW-TIES! Yes, tutorials are all over the internet, and in fact one of my most popular posts of all time on pinterest, is the Big Bow Tutorial. Which you can use to make the bow-tie itself. This tutorial is for making it work on girls, women, and baby boys with crew neck instead of collared shirts.
Materials needed:
a bow, large or small, fabric, leather, felt, crochet/knitted, whatever you want!
2 snap clips as shown below
hot glue/gun

I love bows and bow-ties, but the traditional way to make one has a band around the neck, or a clip that goes sideways, and both require a collared shirt to be worn. I originally came up with this solution when a friend of mine asked me to make some felt bow-ties for her baby who mostly wore onesies, but I figured out it works for adults as well.
 1. hot glue the two clips on to the bow, at the width apart that works for the wear-er/ bow. Okay, now you are finished.
Attach to yourself, your baby, your son or daughter! I love love love mine, and made 3 at once.
 And if you happen to own one of THESE adorable collars, then you can attach it for another look! Eek! (note: she didn't make the collar shown above, hers are higher quality (I own quite a few), this was an attempt at making a rectangle that I somehow accidentally made into a curved rectangle, much like a collar!!)

Friday, December 7, 2012

Easy DIY kids ornament!

 We are doing a holiday activity every day as one of our advent "calendars" this year, which has been really fun! It has helped me get in the spirit of Christmas, and since my oldest is 3 1/2 this year she is really into everything we do. One of the first cards she pulled out said to "Make an ornament for the tree."  And I came up with this fun idea when we were at the Christmas tree lot!

Materials needed:
free slice of christmas tree trunk (you can go to a lot and ask for whatever they have. We didn't even buy a tree, just gathered loose branches and this trunk disc!)

paint, glue, glitter, spray paint (whatever materials you have on hand)

twine/yarn/string and hot glue (or drill a hole)

1. I spray-painted the disc gold on both sides
2. Olivia (3 yrs) painted it with her tempera paints
3. She added drops of elmer's glue and then sprinkled a few colors of glitter on top. We left it to dry over night.
 4. I cut twine and hot glued it to the back, sandwiched with a piece of felt. 

Easy! They make an ornament that is gorgeous and so simple! I like those kind of projects:)!!

Friday, November 16, 2012

The Indecisive Shirt

Have you ever made a shirt embellishment that A. you weren't sure would hold up well in the wash or B. weren't sure if you could solely commit to? I have, over and over. So when I received my snap-tape, which is so awesomely available in separate pieces (meaning you can buy JUST the "male" side or JUST the "female" side--depending on which you need more of), I knew exactly what I wanted to do with them! Indecisiveness problem solved!
1. I first sewed a strand of FEMALE sided snap-tape to the shirt, top-stitching down each side (and I folded it over the top of the collar and the bottom hem of the shirt, so that there is one snap inside on both ends)

2. I made 4 (okay, no really, I made like 15 because its SOOOO quick and easy) pom-poms using my "My Own Fringemaker" (which is my new favorite quick-crafting machine!!) and hot-glued 1 MALE sided snap-tape button (I cut one square of snap-tape) onto the back of each pom-pom. (One pom-pom is large and the others are medium.)

3. I snapped those suckers on that shirt. Easy Peasy! And I can take them off when I wash the shirt. And maybe its just me, but I also like the look of just the snap-tape just down the middle of the shirt....perhaps its from watching so much Project Runway over the past years (they always use utilitarian materials in innovate ways).

SECOND OPTION:
And then I had another idea...

(1. and 2.) I used my "My Own Fringemaker" to make a bunch of the long, loopy hot-pink strands you see above. Its easy, since this machine allows you to do 2 at a time. I simply wrapped the yarn around the 2 poles, tied off, and then transported my wrapped poles to my sewing machine, where I sewed down the center.

3.I  got a strand of MALE-sided snap-tape, my loopy pink strand, and some pre-made pom-pom strand .
4. I sewed the snap-tape down on both sides to JUST the loopy strand.
5. I hot-glued the pom-pom strand to the loopy stuff (which I could do, simply because this strip will be taken off before I wash the shirt!).

And then I snapped the strip to the shirt. Love. And yesterday my daughter Olivia wore this version of the shirt for our first professional family photoshoot. I am so in love with this idea of multiple decorations for one shirt!

Thursday, November 8, 2012

pom-poms and mis-matched shapes!

I am on a ROLL! How many posts have I done this week? THREE!! And this is the FOURTH! woohoo! Hopefully people are still reading my blog, and not coming here solely from pinterest... Though I am greatful to all those who have pinned my blog and keep people reading it! One day I will decide to make more money off this thing using those stats. Speaking of, any of you want an ad on my blog? I'm thinking $10/month same size as those on the right. I get usually 11,000 hits/month!

Email me if you are interested. Now's the time, its the holidays!

Okay, on to today's little inspiration station.
Pom-poms and such.

 The jumper. It was a hand-me down of course, and so I was excited to re-vamp it. I bought some strung pom-poms at Jo Ann's and just pinned and sewed them straight to the hem of the jumper. Done.
The leggings I spotted on Pinterest and knew immediately that I had to make some knock-offs! She has worn them for three days now bc I think they look cute with everything.

The top, which you can't really see, is just a plain shirt that I sewed a cut-in-half doily onto the shoulders of.

The shoes, again can be found here (tutorial).

And there you have it. Living vicariously through my children with their wardrobe. While they still let me!

Thursday, October 25, 2012

The Frances Collar Tutorial!

(Olivia insisted on wearing that clip even though I know its a little much with the shirt....)
My little cutie-pies have a lot of plain shirts that need to be snazzed up, so I came up with this faux-collar recently. You can check out the full tutorial (and pattern) for this "collar" over at Leafy Tree Top Spot for her TOP-TOBERFEST (there are lots more great top-re-do's over there!) Go check it out!

(P.S. Amélie's shoes were made using this tutorial)

Tuesday, October 16, 2012

Baby Boys (and girls!): Newborn shirt re-do

When I get ready for a new baby, I make a lots of new clothes, blankets, and room decor. In order to get more bang for my buck (which is more about time than $$), I like to take existing (hand-me downs usually) clothes and just put a new twist on them. You can see this on the following girl and boy tutorials:
BOY PANTS, BOY'S Oxford shirt re-vamp, Girls herringbone leggings, French dotted baby shoesTuxedo dress, and many more!!

Why? It takes less time, and I can still feel like their clothes have a special "Katie" touch to them! Then I can spend more time making special pieces later. And in that spirit, here is my latest "Preparing for baby BOY??!!" shirt re-vamp tutorial. Its easy! Its fast! DO IT!

 What did I do exactly? I added bias tape to the top of the shirt, and velcro for better coverage/ less weird bunching. (And I dyed the green one obviously!)

Materials:
-kimono tops from the hospital (I had these from my 2nd baby's birth) or I believe carters and gerber make them too...
-bias tape  (I used single fold, but just use whatever you have that will cover the original shirt trim.)
-sew-on velcro--about 1- 1.5 inches.
-RIT dye (if you want to dye it first)

(YOU CAN DYE IT FIRST IF YOU LIKE--see my tips for dyeing here)
1. pin the bias tape around the existing hem of the shirt, making sure to tuck under the raw edge of the bias tape at the ends.
2. Top stitch it to the shirt 2 times, as you can see in the above photo. Be careful as you go around any snaps you are covering!
3. I find these newborn kimonos to be frumpy and easily disheveled, so I added velcro for stability. Make sure you bring it in from the edge, so that now velcro edges will touch the baby's skin and irritate it!

And that's all folks! An easy newborn shirt for boys (or girls!)


Tuesday, September 18, 2012

Reconstructed Boy Pants: DIY


The finished product. Not quite as cool as the pants below (which are about $60 each), but if you are short on time and have a stash of hand-me-down boy clothes (or girl!!), here is a quick and easy way to give those basic baby pants a little character.
 links to these and more boy ideas found here. P.S The above pants/leggings could also be easily made from scratch, but this is the revamp-your-hand-me-downs version.


Materials needed:
some basic cotton pants
stitch ripper
fabric similar to the pre-existing pant

1.fold your pants in half and cut at an angle (or straight across)
2.Fold your new fabric in half and cut 2 of the same shape as you just cut off the old pants. MAKE SURE YOU ADD IN A SEAM ALLOWANCE for all 4 sides, and extra for the bottom, which you will be rolling up (see the image in #3?--that shows the difference in size for the one I cut off and the one that will be replacing it).
3. see above
4. Use your stitch ripper to undo about an inch of stitches up the inside seam of the existing pants' legs.
5. fold and pin the bottom of your new pant leg bottoms so they equal the same size as the old piece you cut off and top-stitch the  cuff (one line across the top of the cuff, and one across the bottom).
6. pin right sides together and sew the new pant leg, but don't close up the leg on the inseam. (see below #7).

7. You see how we left those inseams open? Now turn the entire pair of pants inside-out and sew up the new inseam so that everything lines up. Clip your strings and you are finished!

Pin it! Do it! Woo hoo! We can make baby boy clothes cool too!!

Wednesday, August 22, 2012

Brightly colored projects in the making.

 I haven't been that good at blogging, and so for the sake of having something to post, I decided to grab my iPad and snap a few shots of things I've been working on lately.

Above is the first side of a quilt I am making for bebe boy. I kept it simple so I could A. actually finish it B. actually finish it. I also used it to determine the color scheme for his room, which I hope I don't change my mind about in the next few months. Luckily I have 7 different colors in there, so I should be good (most of you might be wondering if I actually had a color scheme or just threw a bunch of colors on there and called it a day. I promise this was very thought out--and slightly determined by the fabric that was on sale at JoAnn's...). I am winging it as I go (the quilting), so I hope it turns out okay! I am a novice quilter (only made one for Olivia once and it was a baby quilt...)......
I have seen all those lovely vintage suitcase dollhouses on Pinterest and wanted to make one for Olivia's birthday. Never got around to it. A few days before we were leaving for Atlanta (which we never actually left for due to an emergency family situation) I decided to make this box for olivia to entertain herself with in the car.  I did have a small vintage suitcase, but I thought it was a little too cumbersome for a car ride and went with this tea set box instead.

This was one of the funnest (not a word I know) projects I've made for her! I loved designing the felt landscape and the bedding, the furniture, everything. I also  made a silk "princess" quilt for the bed, but that isn't pictured. I highly recommend making one if you have a young daughter. She now plays with it every time we go for a ride.

Wednesday, May 30, 2012

DIY Painted Leggings (Herringbone pattern)

 This is the most simple pattern, and it takes no painting skills! Just some good eyes, and a foam brush. I even let Olivia help me with some of the lines!
 MATERIALS:
Acrylic craft paint (1 or more colors--I used florescent pink martha stewart and gold (some other brand)
foam brush (Pay attention to wideness, as it will help you not have blank areas on the pants. you can do more rows with a narrower brush and less with a wider brush)

1. Put just the tip of the foam brush into the paint. Dab onto the leggings in a herringbone pattern (at a slight angle), one row at a time, changing direction with each row (and/or color).
2. let the first side dry and then turn over and do the other side!
 I was inspired by these people. Seriously, its a husband and wife art school grad duo and if I had more money I would be all over their stuff (adult and kid).
 Don't make my mistake and put lines near the crotch area.... err. oops.  The super cool stays-in-place wired American Apparel knock-off headband she is wearing can be made using THIS tutorial!
 Here is where a wider foam brush would've come in handy, so there wouldn't be that space on the butt. Not too big a deal, but if you are a perfectionist...
I think toddler and baby legs-slash-buns are the cutest things ever. And I love Olivia's new leggings! Okay now go make some for yourself, I know I will be.

Wednesday, May 9, 2012

DIY dotted kid shoes

Okay so this is not really a new tutorial for my blog, but the last one was so long ago that I thought I'd do a new post!


I saw the above photo on pinterest (of course....) but it happened to be from one of my favorite bloggers! Nina makes amazing things and clothes her adorablely Dutch daughter in AMAZING clothes. If there is one blogger out there who's child wardrobe I covet, it would be hers. hands. down.

Anyway, she has these shoes on her wish list. First thing I thought when I saw them was "dream kid shoes" and then next thing I thought was "I can make those polka dot ones." And so, after finding these pink pleather high top baby shoes at H&M I set out to make some "dream shoes!"

Materials:
Acrylic Paint (I used the art kind, but I think you can use house paint or craft paint as well)
paint brush or cotton ear swab!

1.paint the shoes. done.

I hand-painted mine and I think that A. I chose the wrong color (it dried much different than the burnt sienna it started out as) B. I should've used a cotton swab so the dots were all the same(ish) diameter. Oh well. I almost drove the 45 minutes back to H&M to get another pair and do it over and then realized I was just being silly and vain. So these will work fine. Can't wait for Amélie to fit into them!

Tuesday, April 17, 2012

Bobo Choses for my kids' clotheses

I've been eyeing Bobo Choses kid clothes for a long time, but I certainly couldn't fork over the dough for something they will grow out of so quickly. So I used Easter as an excuse to finally make something inspired by their awesome prints (the collar is definitely not bobo choses-esque, that's just my favorite clothing accessory).
Here we are again on Easter... (side note: my husband is in desperate need of better fitting church pants. I told him as soon as he graduates we are getting him to a tailor).
 (the two pieces that inspired this dress)


I did a freezer-paper stencil for the triangles on the fabric.
I traced a dress for the pattern (and cut the pattern out of 4 pieces of fabric so I could do lining by sewing them together in twos, turning inside out, and then sewing the back and front pieces together).

 I did a detachable collar by sewing large stitches on two long rectangles, and then pulling the thread. (And I scalloped the bottoms using my fancy sewing machine function). (Other collar tutorials of mine here and here.)
I added my own seam binding made from the same material as the dress, and sewed on a velcro closure! I love that the collar can be put with anything, but I am sure my friends are already sick of seeing this collar on my girls...
Hope you find something in this to be inspired by! Or maybe you all just think I'm crazy.

Thursday, April 12, 2012

Cardboard Aquarium

This has nothing to do with the post, but here was our happy family (don't the girls look joyous?) on Easter. I had fun making the girls dresses this year and then trying to coordinate our outfits with the girls'. I didn't spend one penny on our Easter get-ups thank you! And I will tell you more about the girls' dresses later this week. For today's post, see below.
 Just like yesterday's project, if pinterest had existed when I discovered Made by Joel (above), my boards would have been FULL with his projects. I love love love love his stuff. Here is another project I made inspired by one of his last year.


This was a joint project this time, not just something I made for Olivia. Again, I didn't actually look at his project when I made ours, I just went off of memory. For ours I got out some 140lb watercolor paper (the good stuff) and had olivia paint freely (she did make me paint a little) and I showed her how you can blow the paint which she thought was really fun. She glued on some pom-poms for rocks and then I assembled the rest (the fish can be moved from the top!!). 

Pretty fun! Give it a try!


Wednesday, April 11, 2012

Spoon people

Before Pinterest was ever created I saw these spoon people on Fine Little Day. I would have pinned the crap out of them, had it existed. The idea was so cool though, that it stuck in the back of my brain and stayed there until 2 days ago when I finally made my own.

Hers are, of course, much cooler. BUT I wanted mine to have another function, which is to use them in our weekly (hopefully one day) "Family Home Evenings."  SO I made one that represents Franc, me, Olivia, and Amélie. Yes, my art skills are much better than this, but I just wanted them to A. be fast (took me about 45 min.) B. not to have to look at any photos or blah blah C. not be stuck at their current age (I didn't want Amelie to forever look like a baby, or Olivia a toddler... so I just did their general features).

Anyway, I didn't look at Fine Little Day's spoons when I did them, but now I am thinking maybe I should paint some clothes, or put some fun little details. But really, since I have 4,697 more projects to get to (before someone make me make another headband), I probably will leave it at this.

Tuesday, April 10, 2012

family memory game

I got this idea 2 years ago. I collected the baby food caps. But they sat there until yesterday when I decided to finally do it. Guess what? It only took about 30 minutes!  It is simple, practically free, and my daughter already LOVES it.


 +

Materials: hot glue (or other glue of choice), circle punch, baby food caps, photos with heads not too large (hard to find in my family of large noggins...).

I paid only the shipping of the photos for this project. I waited until I got one of those emails from shutterfly saying I could get 50 photos free or something like that. And of course the caps came from baby food. This can be great for kids learning the names of their aunts, uncles, cousins, etc but really it is just fun for them to think about and see them as they play the game! I also included some photos of Olivia with the princesses at disney world which she LOVES of course:)

1. punch the faces out
2 glue them
play memory.

(My inspiration came from seeing a family photo/faces fridge magnet diy and a babyfood jar cap memory game. I just put the two ideas together!. voila!)

Monday, April 2, 2012

Instantly

 I love instagram. I have coveted instagrammers ever since I first heard about the app (but I never had an iphone (still don't---new ipad) so I couldn't do it! I am so glad I can capture the everyday so much easier  now (not that its easier than a camera, it just is easier to publish it into books----BLURB!!!!). I am lazy about uploading photos and all that, so this just makes it a tad easier.
This might be my favorite shot captured by my ipad to date (I've only taken like 25). I love the pure joy and movement that is so perfectly Amélie!

Okay back to business. (I mean how many people who read this blog REALLY care about photos of my girls?? not many I'm sure---which is okay because I really didn't care about other people's kids until I had some of my own!!)
 I am still in the process of making my girls' Easter dresses. ( I couldn't start until after FAB so it didn't give me much time (like I just started Thursday). Anyway, here is just a little taste. These are the collars that will top the sheath. I made them detached so I could put them with other things they own! (You all know I love a collar!!!)
And here is miss Amélie trying hers on. Do you see that scalloped edging? Pretty sweet. Just figured out how to do that on my machine (patting myself on the back) photo courtesy of instagram, thank you. ( I have mine set to private, so if you want to friend me you have to ask---no creeps allowed.)