Showing posts with label inspiration. Show all posts

Wednesday, May 16, 2012

Bull-wrap!


 I am over wrapping things in yarn as of yesterday.  
 I also have no idea where to put it. I originally thought Olivia's room but it is so packed with stuff right now, I am not sure! Anyway,  here is my finished product. I just papier-machéd over the bull skull (wrapped in saran-wrap), cut it off, and then taped and re-papier-machéd it. I then wrapped it in yarn with hot glue. Don't you love how I accidentally reattached the horns going two different directions?? WHOOPS! It drives my husband crazy, but I kind of think its funny and I don't care enough to fix it.
Oh yeah, and there are my wrapped and braided cords that have no covering for the lightbulbs. Eventually.

Wednesday, May 9, 2012

DIY dotted kid shoes

Okay so this is not really a new tutorial for my blog, but the last one was so long ago that I thought I'd do a new post!


I saw the above photo on pinterest (of course....) but it happened to be from one of my favorite bloggers! Nina makes amazing things and clothes her adorablely Dutch daughter in AMAZING clothes. If there is one blogger out there who's child wardrobe I covet, it would be hers. hands. down.

Anyway, she has these shoes on her wish list. First thing I thought when I saw them was "dream kid shoes" and then next thing I thought was "I can make those polka dot ones." And so, after finding these pink pleather high top baby shoes at H&M I set out to make some "dream shoes!"

Materials:
Acrylic Paint (I used the art kind, but I think you can use house paint or craft paint as well)
paint brush or cotton ear swab!

1.paint the shoes. done.

I hand-painted mine and I think that A. I chose the wrong color (it dried much different than the burnt sienna it started out as) B. I should've used a cotton swab so the dots were all the same(ish) diameter. Oh well. I almost drove the 45 minutes back to H&M to get another pair and do it over and then realized I was just being silly and vain. So these will work fine. Can't wait for Amélie to fit into them!

Tuesday, April 17, 2012

Bobo Choses for my kids' clotheses

I've been eyeing Bobo Choses kid clothes for a long time, but I certainly couldn't fork over the dough for something they will grow out of so quickly. So I used Easter as an excuse to finally make something inspired by their awesome prints (the collar is definitely not bobo choses-esque, that's just my favorite clothing accessory).
Here we are again on Easter... (side note: my husband is in desperate need of better fitting church pants. I told him as soon as he graduates we are getting him to a tailor).
 (the two pieces that inspired this dress)


I did a freezer-paper stencil for the triangles on the fabric.
I traced a dress for the pattern (and cut the pattern out of 4 pieces of fabric so I could do lining by sewing them together in twos, turning inside out, and then sewing the back and front pieces together).

 I did a detachable collar by sewing large stitches on two long rectangles, and then pulling the thread. (And I scalloped the bottoms using my fancy sewing machine function). (Other collar tutorials of mine here and here.)
I added my own seam binding made from the same material as the dress, and sewed on a velcro closure! I love that the collar can be put with anything, but I am sure my friends are already sick of seeing this collar on my girls...
Hope you find something in this to be inspired by! Or maybe you all just think I'm crazy.

Thursday, April 12, 2012

Cardboard Aquarium

This has nothing to do with the post, but here was our happy family (don't the girls look joyous?) on Easter. I had fun making the girls dresses this year and then trying to coordinate our outfits with the girls'. I didn't spend one penny on our Easter get-ups thank you! And I will tell you more about the girls' dresses later this week. For today's post, see below.
 Just like yesterday's project, if pinterest had existed when I discovered Made by Joel (above), my boards would have been FULL with his projects. I love love love love his stuff. Here is another project I made inspired by one of his last year.


This was a joint project this time, not just something I made for Olivia. Again, I didn't actually look at his project when I made ours, I just went off of memory. For ours I got out some 140lb watercolor paper (the good stuff) and had olivia paint freely (she did make me paint a little) and I showed her how you can blow the paint which she thought was really fun. She glued on some pom-poms for rocks and then I assembled the rest (the fish can be moved from the top!!). 

Pretty fun! Give it a try!


Wednesday, April 11, 2012

Spoon people

Before Pinterest was ever created I saw these spoon people on Fine Little Day. I would have pinned the crap out of them, had it existed. The idea was so cool though, that it stuck in the back of my brain and stayed there until 2 days ago when I finally made my own.

Hers are, of course, much cooler. BUT I wanted mine to have another function, which is to use them in our weekly (hopefully one day) "Family Home Evenings."  SO I made one that represents Franc, me, Olivia, and Amélie. Yes, my art skills are much better than this, but I just wanted them to A. be fast (took me about 45 min.) B. not to have to look at any photos or blah blah C. not be stuck at their current age (I didn't want Amelie to forever look like a baby, or Olivia a toddler... so I just did their general features).

Anyway, I didn't look at Fine Little Day's spoons when I did them, but now I am thinking maybe I should paint some clothes, or put some fun little details. But really, since I have 4,697 more projects to get to (before someone make me make another headband), I probably will leave it at this.

Friday, March 2, 2012

Pimp your Cord


All links and more ideas can be found here! I have at least 10 projects in the works, and another FAB sale I am preparing for so this might not be done soon, but it WILL be done!

HOW TO WRAP YOUR CORD: when I wrapped my cord,  I just got out a bunch of yarn colors that I liked and would wrap them around the cord. In order to switch to the next color, I would just overlap the next color over top of the previous one about 1 inch. At the very end I hot glued the piece down! done. And it really doesn't take as long as you think. Like maybe one or two movies worth?

Saturday, December 3, 2011

New Traditions


This is the first Christmas that we have a daughter who is aware of it being Christmas! I am so excited to start family traditions, borrowing some from my own childhood. My parents always did a great job at creating fun traditions for all of the holidays and I want that for my own daughters.

So I saw the above photo on Pinterest (via Poppytalk) and thought it would be a fun one to incorporate on "St. Nick's." I basically just went to the dollar store, got a few candies and trinkets and wrapped them in crepe paper (from the dollar tree as well), glued the end down and added some scraps from my headbands!  The fun thing about these balls (a mexican tradition I believe it said) as that you find more prizes as you unwrap them, which kids love of course.

I stuffed the Christmas ball into the sock she left out on the eve of St.Nick's as well as a few other fun things.

(pictured above with the ball are the cinnamon dough ornaments that I made with my mom. So fun and easy! Olivia thought they were cookies, thus the decapitated one on the bottom right:))

Its beginning to look alot like christmas!

Before I say anything about Christmas (my favorite holiday of the year!!),  I should say something about Thanksgiving since I've been absent in the blog world since november 9th..... (last post).
That cute gal pictured above? Well move over Martha, that's my mom. And she put on one gorgeous Thanksgiving this year!

 White, white, white with hints of browns and blue. gorgeous. Are you a little bit jealous of the weather you see outside those windows? I believe it was in the 70's for Thanksgiving....
                                                                          perfection.
and if you like her style, you should check out her shop. It is filled with super cool vintage goodies and adorable winter slash holiday banners! (There is a rumor I am getting one of those soon... I'm hoping this reindeer one...)

Tuesday, November 8, 2011

I love/hate pinterest

This DRIVES ME BANANAS. Back in March, when I thought I was buying that house which had all those tans walls, I had the idea to use white contact paper and PAINT designs on it for the baby's room. I had painted these large, abstract flowers using house paint and acrylic paint, and then cut them out to apply to the walls (mine were more like large, long decals). Well, we didn't move into that house, and the apartment we DID move into had/has the horrible textured walls that contact paper won't stick to. So I threw them all away.

Fast Forward to this morning when I saw the above image on pinterest. Oh what a great idea, painting on contact paper. As seen on Apartment Therapy and now going to be all. over. pinterest! I know this shouldn't get to me, and there are rarely ever any completely original ideas (my art teachers used to always emphasize this), but still. I want my blog to bring you fresh, new ideas and things you haven't seen done a bazillion times! And now, because of good ol' pinterest (which I really do love most of the time), ideas like this (and many others believe me) are no longer new. So boo. If I do do it for a future apartment I'll let you know:(

Does this happen to any of you??!!!

Thursday, October 13, 2011

Olivia's room, Florida, 2011

 I wanted to do Olivia's room in red and cream with hints of aqua this time around. I was inspired by this awesome vintage dress I bought her this summer. Except then I had to face the annoying fact that I can't paint or do anything fun to these annoying textured walls (no contact paper for me this time around. boo).

I wanted to have her entire room done in the 3 weeks between moving in and having my baby (as well as the rest of my apartment and all the furniture I had to repaint... I completed most everything though! thank goodness since I haven't had a chance to do anything like this since Amélie was born).  I went back and forth and became very frustrated trying to come up with something that wasn't already pinned all over pinterest (I love pinning, but I also like having my own ideas!!). I thought clouds! ohhhh so done already. scallops! no did that in her last room... I went around and around.

Finally I decided I wanted to continue surrounding her with abstract art/decoration so that she learns that art doesn't always have to be creating things that already exist (people, animals, etc). Maybe you think I am making this up, but I really do want my children to be creative and open to what art can be.
Anyway, I made the bookpage blobby things you see above. And I really don't love them them. But sometimes I like them. but mostly I don't. You see so indecisive about this room. When she switches to a bed (instead of crib) I will change the wall hangings, but keep the color scheme. Anyway, hopefully someone out there likes them!

long explanation. sorry.
 This is my favorite piece in the whole room! Another piece that I painted using the paint from this series of redone furniture... (I did all those pieces with only 2 little paint samples!!). I taped off the legs and used this trick to make sure the paint didn't bleed through. I love the legs on this thing.
 Those are the pinfamous ikea spice rack bookshelves.  I spray-painted them red.

 corner of the room... (the yellow on the side of the bed is leftover from her old room/color scheme, as is the  dust ruffle...). made the crib sheet of course. and that big ball/pouf (see here).
 I was really trying to get Olivia more interested in numbers without forcing them on her....
These are mini canvases that I spray painted and then glued book page numbers and white paper on. The praying children are from Goodwill. I planned on painting little red triangles around the edges of the "torn" paper edges on them, but haven't gotten around to it.
 I do love the way the book pages look around this window though! I happened to have that rug from anthro (when I worked there years ago) that I was sick of using elsewhere in the house. It went perfectly in here!! yipee!
 alphabet (Martha Stewart--my mom gave it to me), dress-up box, trash can. exciting.
And here is all the crap I cropped out of the photos:) Thought I'd make this real. I like it when people show how things really are in their house so you don't feel like a domestic failure when you see their blog photos.

So there you go! what do you think?

Tuesday, September 13, 2011

dance dance tu tu

Olivia started her first creative dance (ballet and tap) class today.  I really want/need to make her a little tutu to wear. Today I copped out and sent her in a little tutu-ish skirt from the Gap... But I have big plans. Okay I have no plans. I just know I need to make her something that is hopefully somewhere in the vicinity of the these beauties (found via this lady) Now where to find the time....
(and to all you bloggers out there with an infant and a toddler who have a blog and a shop and are STILL FINDING TIME TO BLOG.... how in the hello! are you doing it???!!!)
and when I find that time (is it in a pot at the end of a rainbow?) I will surely be making one for me inspired by this beaut. And I'll stand up against a pale wall with my new glasses on and a cardigan buttoned up backwards.  I will definitely be sucking in my stomach.
off topic, but I really want to copy this cool dress for either the girls, or for me.... bye bye for now!

Thursday, August 11, 2011

Before I had the baby...

The month before I had Amélie (I found out how to put the accent on!) I was working on lots of projects because I knew it would be a while before I could do any of that again (and believe me, everything that I didn't finish beforehand is still sitting there waiting. and waiting.) I have lots more to show you all, but for today I am just going to give you a peak at a few random things I did that were inspired by pinterest!
I made 22 meals and froze them! I knew a few people would bring me meals, but I hated the thought of  grocery shopping and making dinners while trying to balance a newborn and a toddler. I've seen this a million times on pinterest but never got the guts to try it until now. I bought THIS book  which teaches you the secrets of freezer cooking and also has tons of recipes! I probably could have figured out most of it from researching more on the internet, but its nice to have all the info in one place. Here is what I made:
pizza dough/kits (with cheese and veggies already portioned out) 4 nights
tortilla soup (4 nights)
chicken/cream cheese/beef rolls (4 nights)
chicken enchiladas (3 nights)
pulled bbq chicken (3 nights)
Hawaiian chicken (3 nights)
pre-cooked and pulled chicken for a tortilla salad (1 night)
A lot of these meals are just needing rice, fresh veggies, or some tortilla chips which is no problem. And let me tell you these things have SAVED me! I think this is my new way of cooking. First of all, it takes me no time to have dinner ready and then I am only spending around $30/wk to get the rest of the essentials (milk, bread, fruit, veggies, and some fun stuff). I DO use coupons though, so that helps. My initial cost for the freezer meals was only $60. I didn't buy any fancy meat though, like I would've liked (fancy as in free-range).

Okay I could go on and on, but let's just say freezer cooking is the bomb!
I saw this several times on pinterest and though it might be overdone, I still kinda loved it. Its this picture frame, and I just cut a piece of board to fit the frame and painted it with chalkboard paint, and spray-painted the frame yellow (no priming). It had two holes so I used my trick to hang it:)

 Last, it was my husband's birthday (and then Olivia's)  so I wanted to put up some simple decorations for our family parties. I had seen these on pinterest as well, and let me tell you they take very little paper and time to make! so simple (and so much cuter in person)!  I didn't have time or energy to make anymore decorations though and since it was just my parents, brothers and sisters coming over I didn't feel any pressure to put on something over-the-top. I still haven't taken them down...


Sunday, July 3, 2011

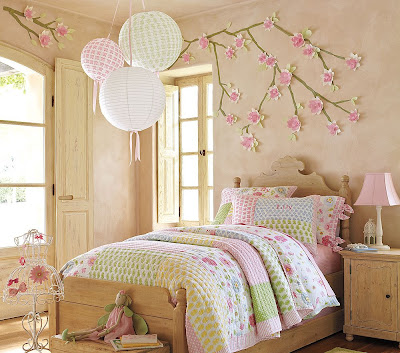
pottery barn wall mural

In April, when I was still in Georgia, a friend asked me if I could do something to her daughter's walls. She gathered a few of her favorite ideas, which happened to all be from the Pottery Barn Kids catalog. Normally I try to do my own thing/idea but she really liked the one above, and I figured why not just do it for her? I don't always have to be original and it was pretty and really perfect for the room. Just thought I would share my version and how I did it!


(sorry for the crappy photo quality, I only had my point and shoot camera when I took these! )

Materials:
pink cardstock
darker pink tissue paper
brown wall paint
green cardstock/scrapbook paper
hot glue
3m removable wall tabs

1. draw out (with pencil) the basic tree shape
2. paint the trunk/branches with the brown wall paint (I only needed 1-2 layers)
3. cut out 3 different-sized flowers out of the cardstock and tissue paper
4. bend the cardstock flowers by holding in the middle and lightly scrunching so they have some 3 dimensionality
5. hot glue the tissue paper flowers to the cardstock flowers.
6. cut out a bunch of leaves and hot glue them in pairs.
7. cut the 3m tabs into much smaller squares and adhere them to the flowers and leaves.
8. attach them to the wall! done!

Tuesday, April 26, 2011

Pimp my house...

well, as it turns out NOT my house. The lenders decided not to give us the loan 2 weeks before we closed. And we tried everything in our power to make it still happen, and it just wouldn't work. Near perfect credit and enough income, but there are are little details that just made them say "no." And well, it just must not have been meant to be. It was VERY hard for me at first. I have a sketchbook filled with little painted rooms/mock-ups I did as I was deciding how to decorate my very first house. So I was a little let down when it all went to pot:( BUT MOVING ON!!!

We aren't going to buy, but rather KEEP renting. ugh. But I swear I will get a single family house or something as close to it if I can find one in our budget (and renting something smaller than what we would have had is going to run us at least $300 MORE per month then if we'd bought that house!!!!) grr.

anyway, I am putting up some of the inspiration I was using for the old one, and though I probably won't get to paint my rental, I can still dream of the future...and share it with all of you in the meantime:)

 I love the color schemes of the top two photos, bright but classic (I tend to go with bright and funky, but I am trying to be more classic if possible!!!). My last statement completely contradicts this next one: I would love couch in the photo on the bottom left... (maybe slightly different, but definitely digging the mixed patterns. my couch is close, but not quite there). And I will definitely be doing one of those painted IKEA rugs (not sure what pattern yet) for my new pad. I am getting sick of all my anthro rugs that I've had for the past 6 yrs.
 1. chalkboard contact paper. At least I can keep this idea, since contact paper works in rentals:) Not sure if I'll do a calendar or if I'll do it for the play area, but I definitely want some!
2. oh how I love the chartreuse walls next to the white bookshelves, and esp. all those little pops of color... one day.
3.I was planning on doing fat stripes (either grey or aqua) in my living room. Not so much anymore, unless I do them with contact paper. This rental house maybe covered in contact paper....
4. I can still do this one! I want to refresh some of my furniture (that I painted LAST time I moved and was pregnant:), and I like the two-toned look.
Organizing and Decorating:
1.I've always like the idea of the pipe clamp things with the mason jars. Combine it with painting the insides of them and it could be very pretty!
2.Chandelier... I think I could make this with beads and embroidery hoops. If my infant (only 10/11 wks to go), toddler and my business all give me a little time off so I can do it:)
3. you can't tell from the bottom left photo but this is chicken wire and clothes pins! Great alternative to bulletin boards!
4. These are actually bookshelf frames you can buy, but I think I could make them cheaper with thrifted shadow boxes all painted the same color (take out the glass and backing).

Thursday, March 24, 2011

Dyed paper doilies


 A month ago I dyed a huge batch of wool felt to make my spring headbands out of (which I have yet to put on etsy since they all went to stores... sorry I'll get some on there soonish! Of course you know I always love to throw other things in the dye and so along with some of Olivia's clothes went about 100 paper doilies (from the dollar store).

I have been wanting to dye some ever since I saw an idea in M.S. magazine on putting dyed doilies on top of wrapped presents. But I might like these ideas below even more...


To dye doilies:
1.Fill a portion of a pot, tupperware, or kitchen sink with hot water (doesn't need to be too too hot).
2.Add some RIT dye
3.separate the doilies and submerge them in the water.
4.leave for about 5 min. no more (they are so thin they could disintegrate).
5.Take them out all stuck together b/c they have more strength in numbers:)
6.put them out in the sun/outside (on top of thick papertowels or something) to dry, with a rock to weigh them down.
7.Flip them over to get the other side drier, or bring them inside, separate them, and let them dry some more.
 pretty! A garland for a party, or Easter, or maybe over my baby-to-be's bed (oh P.S. ITS A GIRL)
Or the ever popular party poofs, but made with doilies!  I love the hand-dyed look too, because it would give the poofs a little more depth with varying values of color.

P.S. If you haven't entered the Shabby Apple Giveaway then do it now! only 89 entries so far, those are some good odds for winning a really cool dress! (you have lots of ways you can get multiple entries too!)